

Risk Management is fundamental to today’s dynamic business world. Companies are constantly facing a series of challenges that can affect their goals and their long-term sustainability.
This management emerges as a vital tool to protect the interests and boost the success of companies.
The recent release of the Risk Management module in the Fusion Platform promises to revolutionize the way organizations of all sizes and types deal with potential risks.
Check out more about this new feature and how to get a number of significant advantages.
What does the new Risk Management module cover?
One of the key features of the new module is its ability to help organizations identify and assess a wide range of risks that may affect their objectives.
From operational risks to financial, legal, compliance, and information security issues, the module provides a comprehensive view of the threats an organization may face.
Once identified, the module facilitates the assessment of the likelihood and impact of each of them. This assessment allows organizations to prioritize their efforts and allocate resources effectively, focusing on the most critical and urgent items.
In an increasingly complex and volatile business environment, this management becomes a fundamental piece for organizational success.
Fusion Platform’s new Risk Management module empowers organizations to meet challenges with confidence, seizing opportunities and protecting their interests effectively.
By integrating threat identification, assessment, mitigation, and monitoring into a single, powerful platform, the module offers a comprehensive and proactive approach to Risk Management, helping organizations reach new heights of efficiency and resilience.
The Risk Management module of Fusion Platform
To familiarize yourself with the solution, the first action is to access the “Manage Contexts” tab on the Fusion Platform home screen.
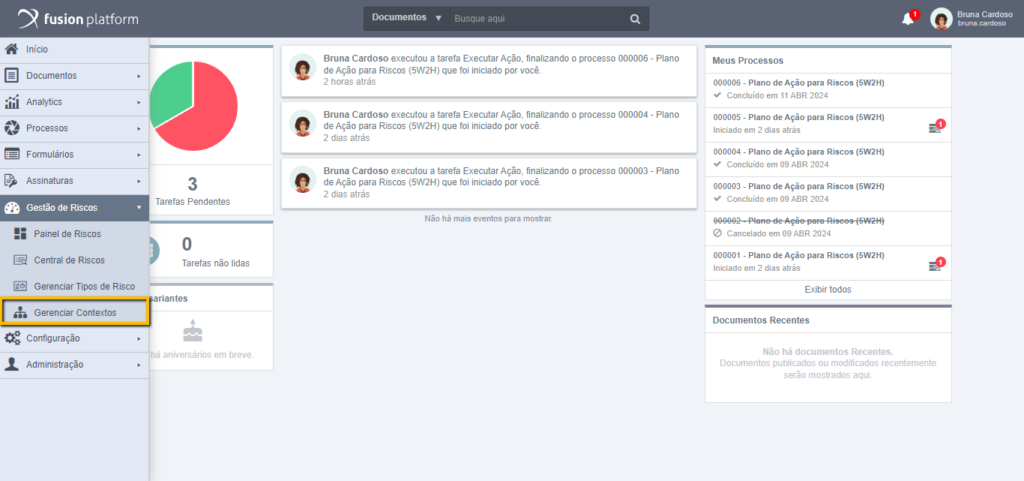
In this environment, it is possible to monitor and establish a context to manage the specific risks of processes, issues, or projects. Distinct risk management methods can be created for each context as required.
To start a new context, simply click on the “New” button. On the next screen, you will need to include the context of this risk. To do this, enter information about:
- Name: Name of the context. This field is required and allows up to 255 characters;
- Description: A brief guideline on the use of context. Filling is optional and allows up to 2000 characters.
When you click “Save”, a confirmation message will appear, informing you that the context has been successfully created. From that moment on, whenever you access “Manage Contexts”, this risk will be listed.
Once you have configured the required contexts, you can create new categories and risks by associating them with the context you created. To do this, go to “Category Settings”, and “Contexts”, then include the pertinent data and definitions, such as those responsible for the task.
It will also be necessary to register a type of risk. By clicking on “Manage Risk Types” in the left corner of the screen, Fusion Platform will present a list of pre-defined types.
Among the possibilities are the risks: environmental, financial, market, operational, health, safety, technological, among others.
Even if this list can cover multiple areas of the organization, it can be edited or deleted as needed. In addition, the user can create new types by simply clicking on “New” and setting information such as the risk type name and description.
Clicking on the confirmation message adds the new risk type to the possibilities.
Risk Management
To start Risk Management, it is necessary to identify which threats already exist in the organization and analyze possible alternatives to solve them.
This approach takes into account available resources, deadlines, costs involved, and, in some cases, monitoring actions regularly.
List of Risks
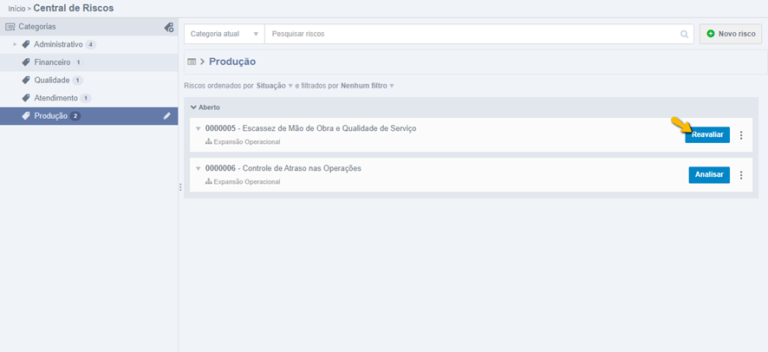
In the Risk Center, each item is indicated by a code and a name. The information is presented in the form of a list, and each element can be viewed or edited by responsible users who have been indicated in the risk context configuration.
Just below the code and name, the context related to this potential risk is presented.
In addition, the risk card also includes an action button. This button directs the user to the edit, allowing the necessary information to be filled in.
The button will always display the name of the next step to be taken. For example, if the risk has been filled up to the Identification step, the button will be labeled “Analyze”; if it is in the Analysis stage, it will be “Evaluate”; and during the re-evaluation, the button will remain as “Re-evaluate”.

Setting Up Categories
Another important point of the Risk Center is the possibility of creating a list of categories to structure the platform according to the needs of the organization.
Because they are customized, they can be segmented by the cities of the units, by functional areas or however the company prefers to categorize.
There are cases where, after creating the categories, it will not be possible to add risks to them. This happens when:
- The category does not have any context registered. In this case, it is necessary to register a context within the category, which can be done at any time by the responsible user;
- The logged-in user is not responsible for any context within the created category. Even users who are responsible for the category can’t add risks if they aren’t responsible for some context.
Categories can be organized into subcategories, creating a hierarchy of up to three levels.
To add a subcategory, simply select the desired category, click on the edit icon and the “Create subcategory” icon and fill in the necessary information in “Category Settings”, in the “Data” option.
Data Configuration
In the first tab, entitled “Data”, we will find three fields to be filled in:
- Name: Enter a name for the category (64-character limit). Required field;
- Assignees: Select groups, roles, or users responsible for the category. They will be allowed to edit and configure Contexts and Assignees;
- Description: Enter a description for the category (2000 character limit). Optional field.
Configuration of Contexts in the Risk Management module:
After defining the name of the category and its Assignees, it is possible to create one or more Contexts. It is important to note that a category can be saved without having a Context, but it is necessary to have at least one to create new risks.
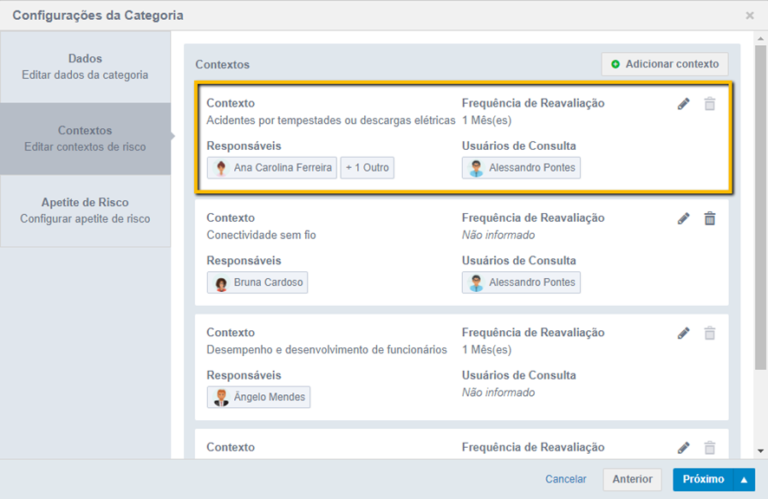
Contexts can have designated assignees and include Query Users. Click “Add Context” to set up a context.
At this point, some fields will be presented for completion:
- Context: Required item and some context suggestions are displayed when typing some words. For its configuration, it is necessary that the Manage Contexts module has been previously created.
After selecting a context, you can define the frequency of reassessment of the associated risks.
Custodians play a key role in the supervision and management of risks, while consultation users monitor the status of risks, contributing to more robust management.
These definitions are crucial to fostering an effective and collaborative risk management culture.
After saving a context, your information will be displayed on the screen, including details about assignees, reassessment frequency, and query users.
Risk Appetite
The Risk Appetite setting is the last step in setting up the category. It is crucial to define the levels of probability and impact of risks, as well as the actions to be taken in each scenario.
Risk Appetite works as a guide that establishes the limits within which the company is willing to operate, considering the probability and impact of risks.
By configuring it, you can define the levels of probability and impact, and specify the actions to be taken in each scenario.
The system already has default settings for actions such as “Hold”, “Mitigate”, and “Avoid”, but you can customize these quadrants as needed. Customization for risk management can be done by clicking on the desired quadrant and selecting the desired option.
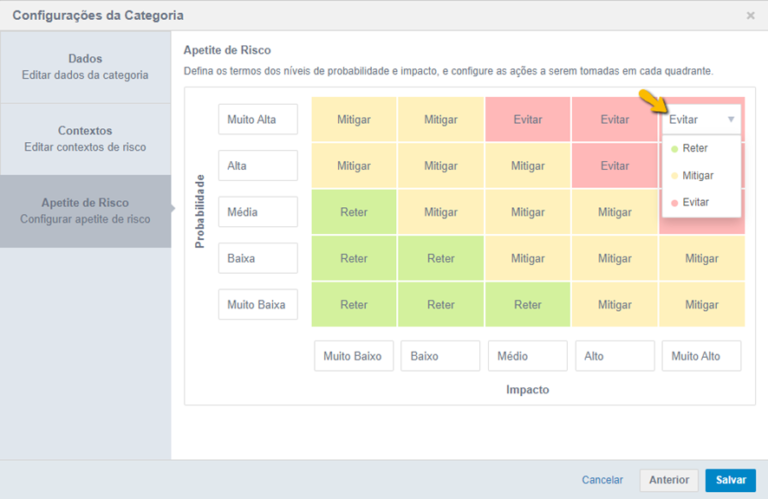
If your risk management strategy is unique and requires a different approach, customize the settings to reflect that approach, including the ability to change the probability and impact nomenclatures.
The Probability and Impact settings defined in the category will serve as a reference for creating risks.
Risk Appetite has a significant effect on the continuous monitoring of risks, guiding management decisions and prioritization of resources.
For example, if the probability of a new product failing in the market is “high” and the financial impact “very high”, the recommended action may be to “Avoid” its launch.
This tool allows the company to set risk tolerance limits and make informed decisions. Once configured, just click on “Save” to create the new category.
Configuring a new risk in the Risk Management module
After creating and configuring a new category, the next step is to create a new risk. Go back to the Risk Center and click on the “New risk” button in the upper right corner of the screen.
In the process of registering a risk, there are the steps of: identification, analysis, assessment of severity and impact, and strategic planning.
Identify step in the Risk
This phase is essential to set up the risk completely. To get started, fill in all the risk-related fields, ensuring that you include essential information such as:
- Name: Risk identification (mandatory, up to 255 characters);
- Code: Unique value, non-editable (sequential);
- Description: Description of the risk (optional, up to 2000 characters);
- Context: Context selection (required, autocomplete);
- Risk Type: Selection of risk type (mandatory, autocomplete);
- Origin: Indication of the origin of the risk (internal or external).
Once you’ve filled in all the required fields, proceed to the next step or save and complete the following steps later.
Performing the SWOT analysis helps in understanding the processes and identifying possible threats.
Analyze step in the Risk
After identifying a risk, it is essential to analyze its causes and consequences.
For example, labor shortages can be caused by the rapid expansion of the market, overburdening employees and leading to delays in deliveries and a drop in service quality. This can result in the loss of customers and business opportunities, damaging the company’s reputation.
Therefore, thorough analysis is essential to implement effective prevention and mitigation measures.
Click on the “Analyze” tab and describe the causes and consequences of this risk. The fields are required and have a limit of 100,000 characters.
After completing all the required items in this step, advance to the next step or save the risk to complete the following steps later.
Evaluate step in the Risk
In the Evaluation phase, it is necessary to fill in the Probability and Impact fields, both mandatory and of the selectable type. The values of these fields are specified in the category settings.
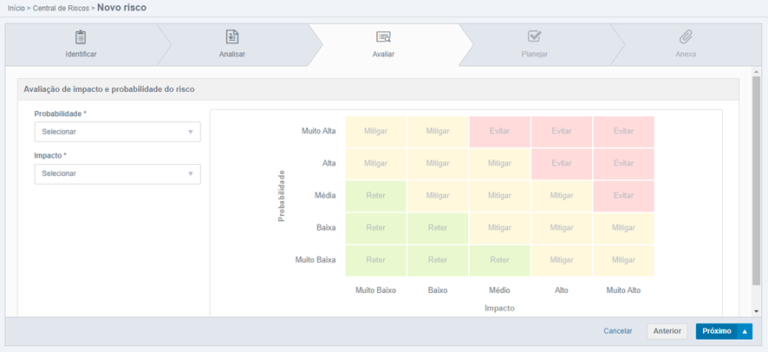
- Probability: Indicate the chance of the risk occurring, with default options such as: Very Low, Low, Medium, High, and Very High, adjustable in the category settings;
- Impact: Describe the effect of risk on the business, with default options such as: Very Low, Low, Medium, High, and Very High, adjustable in the category settings.
After selecting the appropriate options, the system will determine the action required for the risk: Hold, Mitigate, or Avoid.
After you have completed all the required fields in this step, click Proceed to the next step or Save Risk to complete the next steps later.
Plan step in the Risk
This step is not mandatory. Therefore, it is possible to move forward normally without the need to register any action plan.
However, actions can be taken to contribute to adequate and effective risk monitoring.
To start implementing the actions that will guide the management of this risk, just click on the “New Action” button, located in the upper right corner of the screen. This will open a new window to fill in the required fields.
The action plan follows the 5w2h method. That is, it must be delimited who, what, how, why, where, until when, cost and type of action.
Once you have completed the configuration of this new risk, the action plan will be created and ready to be started, if the risk has already been saved previously. Otherwise, you will need to save it to start the action plan.
Step Attachments in the Risk
The attachments refer to any type of file that can be added to the new risk, and is available at any stage of the process. This alternative offers significant advantages for risk management.
For example, when dealing with the risk of a sudden market expansion, attaching relevant documents such as market analysis reports can provide valuable context for making decisions about mitigation strategies.
In addition, document attachments are able to ensure compliance with policies and procedures, helping the company to align its activities with best practices.
The ability to efficiently share information between team members and use the attached files as evidence in audits are also important benefits.
Keeping a complete history of attached documents allows you to track risk-related activities over time.
Attaching files enriches the decision-making process, fosters collaboration, ensures compliance and transparency, and provides complete history of risk-related activities.
To attach a document, simply click on the “New Attachment” button in the upper right corner of the screen. Then, just select a file on your local device or drag it to the window.
The annex is the final step in the creation of the new risk. When you return to the Risk Center, the item that was created will be displayed in the corresponding category.
With the new risk created, it is possible to edit, view or remove it from the system. It can also be reassessed, allowing the action plan to be reviewed and analyzed repeatedly, generating a history with each review.
After the risk is saved for the first time, the Assess step will turn into Reassess. To reevaluate a stock, just click on “Reevaluate”.
Reassess step in the Risk
This is the last phase of the risk, aimed at regular monitoring of the identified risks, detecting possible changes and evaluating the effectiveness of the treatment measures implemented.
By clicking on “Reassess”, options will be displayed to assess the impact and probabilities of this risk happening. Thus, in the left corner of the screen, you have:
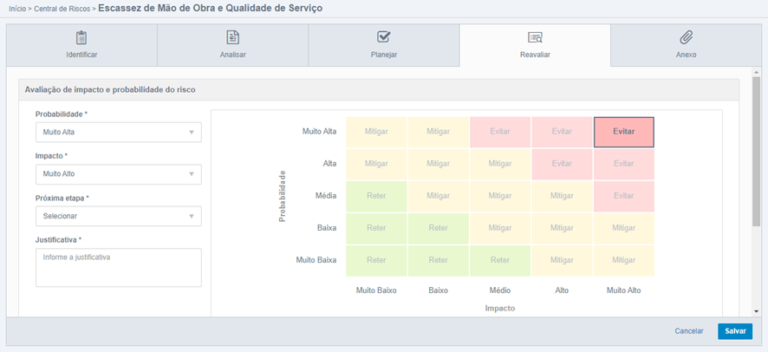
- Probability and Impact: They work in the same way as in the Evaluation stage. On the first visit, they will be filled in with the options previously defined. On subsequent visits, they will show the last values saved in the Reassessment phase itself. According to these values, the quadrant is automatically adjusted;
- Next step: Required and selectable field. Allows you to set the action when saving the risk. “Keep in reevaluation” keeps the risk open and editable, after saving, the field is cleared for reevaluation. “Closing risk” ends it, making it unalterable;
- Justification: Mandatory field, with a limit of 2000 characters. Changes in risk must be justified, not only at this stage, but in all previous ones. After saving, the field is cleared for re-evaluation;
- Assessment History: Stores information on each new risk assessment and decisions made. Includes user data, date, and fields filled in. The first record is from the Evaluation stage, where the “Next Stage” and “Justification” fields remain empty, as they are not filled in.
Close Risk in the Risk
Risk is concluded when it is no longer a significant threat or when mitigation measures have been effective in reducing or eliminating it. This occurs during the Reassessment step, when you select “Close Risk” under the “Next Step” option.
By clicking “Finish”, the risk will be finalized. The absence of an action plan will be displayed as a non-editable field in the Plan step view.
Action Plan Process in the Risk
Just identifying a risk is not enough for the business to be healthy and able to face the competitive market.
With this in mind, Neomind created a resource in the Fusion Platform so that it is possible to develop an action plan to contain and reverse this risk into an opportunity.
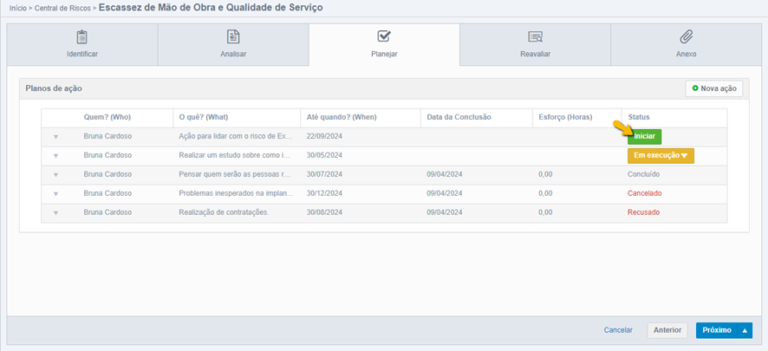
Thus, the process begins in the Planning stage of the risk register, through the Action Plan table.
Only those responsible for the risk can start the process, configured in the category to which the risk is linked, within the assigned context.
In more detailed terms, when you create a category, you need to specify the contexts associated with it.
Each context has its own managers, who will be the risk managers in the corresponding category. They will have the authority to create, initiate, and cancel the Action Plans at this stage of the risk register.
To start the procedure, press the “Start” button. The responsible user who initiates the action plan process is designated as the requester for that particular process.
Specifying the Action Plan in the Risk Management module
The data entered in the fields of the Action Plan are transferred to the first stage of the flow, using corresponding fields. This automatically sends the first activity, and the flow proceeds to the second step, which is intended for the executor.
The executor is determined by the user indicated in the “Who?” field when filling out the Action Plan.
Process managers include all users responsible for the risk in the category/context.
Query users are those designated to query for risk in that category/context. When you press “Start”, the status changes to “Running”, signaling that the action plan is active.
After starting the process, a task is automatically assigned and routed to the person who was defined as “Who” in the action plan.
This task will be available in the Task Center of the user who must click on “Perform Action” to access it.
On the next screen, the user will be able to check the information on this risk, as well as be able to detail the actions that were carried out.
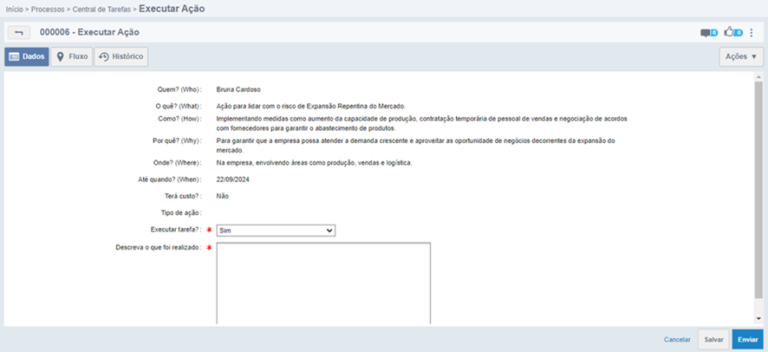
The option to “Perform task?” is a mandatory field that will determine the actions that will be triggered. If “Yes” is selected, you will need to describe the actions taken. For the “No” option, the reasons that made this task not be performed must be filled in.
After filling in the details, just click on “Send” and a message will confirm the completion of the process and the successful execution of the task. Remembering that the author of the process will receive a notification informing that the process has been executed.
Risk Panel
The Risk Dashboard is a tool available to users with Risk Management permissions. Provides an overview of the risk information to which the user has access, with permission to edit or view. Access is restricted to the specific risks for which the user is assigned.
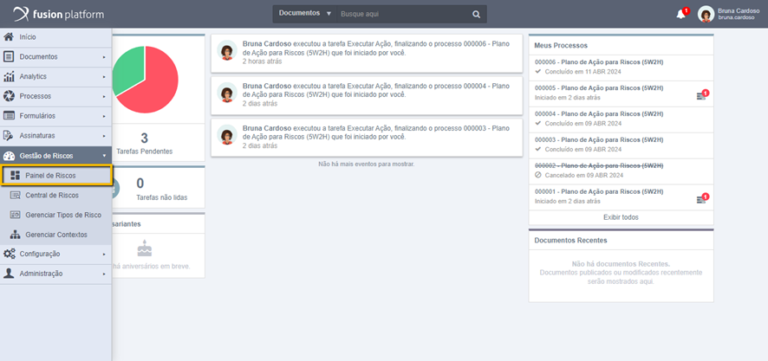
By opting for this functionality, the user will be redirected to the Risk Panel, where they will have access to various aspects and information about the risks relevant to their profile and permissions.
When you open the Dashboard for the first time, the values will be displayed as zero, as there is no data registered yet. After the first visit to the Risk Dashboard, users will have access to an overview of the risks in the organization.
This summary covers active, reassessment and closed risks. The role provides a quick understanding of the risk landscape, highlighting areas of concern, emerging trends, and progress in mitigation.
With this overview, managers and decision-makers can act proactively in risk management to protect the interests of the organization.
Using view filters
Users can use filters by criteria such as period, category, context, and type, making finding them easier. To do this, just click on “Filter”, opening a window with the fields available for filtering.
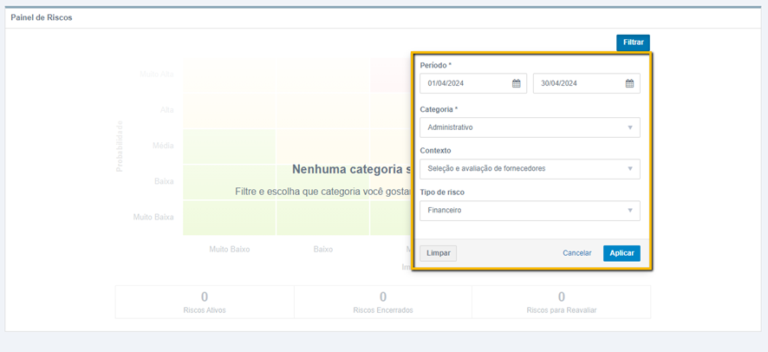
Risk Dashboard filters include:
- Period: two date fields allow you to enter the period of the risks, specifying the start and end date;
- Category: selection is limited to categories or subcategories for which the user is responsible or is associated with some context within them;
- Context: are displayed only after selecting a category, showing only the options for which the user is responsible;
- Risk Type: The options are presented after selecting a category, showing all existing types.
The “Period” and “Category” fields are essential for filtering the Risk Panel, and are mandatory. That is, it is not possible to generate the dashboard without filling in these fields.
After clicking “Apply”, the status of the risks will be displayed on the screen. If you want to remove the applied filters, just use the “Clear” option.
After you apply a filter, it will be automatically saved. When the user returns to the Risk Panel, the last filter used will be applied.
At the bottom of the screen, users can view the Risk counters:
- Assets: These include those at any stage, from Identify to Reassess;
- Closed: are those that have already been completed;
- To Reassess: they are exclusively those who are in the Reassess stage, monitoring to avoid occurrences.

Risk Heat Map
In the Heat Map, it is possible to view the Probability x Impact relationship of all filtered risks, with the total number in each quadrant.
A risk’s position on the map is based on its current situation, considering the last revaluation. By clicking on a quadrant or counter, the user is redirected to the corresponding category, where they find detailed information about the risk.
Regarding the list of how the items are presented, the order remains as configured in the Risk Center. The filter, in turn, follows the definitions established in the Risk Panel.
Why is it essential to perform risk management?
Risk management is a crucial piece in today’s business landscape, where varied challenges can affect the continuity and success of organizations.
With the launch of the Risk Management module in Fusion Platform, a number of significant advantages present themselves to companies of all sizes and industries.
As you can see, this new feature offers a comprehensive approach to identifying, assessing, mitigating, and monitoring risks. It is able to empower organizations to face challenges with confidence and seize opportunities with confidence.
The Risk Dashboard functionality provides an instant view of the organization’s risk landscape, allowing managers to identify areas of concern, monitor trends, and assess mitigation progress over time.
With specific filters, users can easily locate the most relevant risks, while accountants provide an overview of active, closed, and reassess risks.
Finally, integrating risk identification, impact assessment, and strategic planning into a single, powerful platform provides organizations with a robust tool to manage them effectively, fostering a collaborative and proactive risk management culture.
How about starting your company’s risk management today? Try Fusion Platform and be prepared to reach new heights of efficiency and resiliency in an ever-evolving business environment.